Google+ Nine Red: June 2013

Friday, June 28, 2013

DIY Antique Crate End Tables

In the spirit of the front deck projects, I'm going to show you a quickie today, to take those versatile (and cheap!) crates from any craft store, and make them look like they've been handed down from your great great whoever, who actually built them.  No one needs to know they were brand new yesterday.  Yep - we can age these a good 50-100 years in one day.
Ok maybe not 100 years, that would probably be falling apart by now, but I had to say it for effect peole.  Remember when I shared All Things Thrifty's Colorful Antique Crates? Yea, that totally inspired me...  Once we had our furniture for the Front Deck Redo, I was stuck in the dilemma of needing some smallish end tables.  The crates, turned on their sides, would be perfect. But they were too... new...
Forgive me, this is a mid project shot! (Go here to see the finished deck tour) That set of furniture came with some less-than-cute cushions (no offense if you like 'em! To each their own..) and see what I mean about the crates? Too new! Too clean! I was getting kind of obsessive, when I thought - Oh - I'll do that steel wool aging trick from the Floor Mirror Project a while ago. ah-ha!

So let's do that today. Go buy some crates, these were $9 each at our Beverly's, which - sadly - were reduced to $6 the very. next. week.   Oh well, whatevs - $9 is still way cheaper than if I were to make them.  And cheaper than patio tables, what is UP with outdoor furniture prices?!  Hey - while you're out shopping, get some of this stuff:
  • Crates - if you're store doesn't carry them I found some on Amazon, click here.
  • Tea or Coffee.
  • Steel Wool
  • Vinegar
  • Mason Jar
  • Paint brushes
  • Spray Bottle if you're too lazy to brush, like I was.
  • Small thing of a paint color you like, or leftovers that I'm sure you have lying around. 

Be sure to protect your work surface, I used this gorgeous blanket........lol
Line 'em up! Now the aging process that I'll walk you through right quick, consists of this:
  1. Applying an acidic base
  2. Fermenting Steel wool and vinegar
  3. Waiting 24 hours.
  4. Applying the fermented steel wool and vinegar. 
Weird I know, but it works like a dream.  So brew up some really strong tea.  Like 3 bags to one mug of BLACK tea.  I didn't feel like doing that and decided to use coffee that was already sitting in the pot. Just go with the flow...

I normally brush this concoction on, but with all these grooves and nooks I was not excited for this step, so I popped the coffee in a spray bottle.

Always have empty spray bottles around.  Eh, it's acidic, should work.....right?
When you spray or brush your coffee or tea on, it won't look like anything is happening. That's normal, this step is not very fascinating. Just make sure to be generous and get every spot wet with tea or coffee.

Meanwhile, drop a half of a steel wool piece into a jar, and fill with white vinegar until it submerges it. Cover it, it's stinky.

Now, you're done. Wait 24 hours.  Yes, 24. Don't cheat here. I would if I could, you know that! Go do something fun.

THE NEXT DAY....

Feeling pretty proud of my spray bottle shortcut, I put the steel wool and vinegar mix in the spray bottle. NOTE: You can dump the steel wool part, that's all done. Just need that gross grey vinegar.
Within seconds of applying the vinegar you'll see a magical and interesting transformation.  Just spray it everywhere.  That's it, you're done!
 Within a couple hours I had this:
Hooray! 50 years added.  Just let those dry.  Now, here's where I decided they needed a little color.. I put them next to the dark brown furniture and they pretty much disappeared.  Yea.. I didn't need them to blend in THAT much! So I whipped out some leftover paint. This color is Cozumel by Behr.
This one is extremely easy.  Took five minutes.  Take your crate, wet or dry, doesn't matter:
Whip up some paint and water. I did about 2/3 paint to 1/3 water. It wasn't exact. At all.  Then just dabble a little here and there and rub it in.
Imperfection is key here, and it's all a matter of personal choice.  If you want it really bright and bold, cover the whole thing.  Here's my stopping point:
 Did I seal this? No. I could have, and so could you, but I figured - if I was going for the aged look, we might as well let these get old-ER the real way, right?  Here they are in their new home:


So yea - that's a pretty simple project! And while it does take at least a day, the actual time spent on it is way less than an hour, total.  This is one of those projects that can be going on in the background, with spectacular results.  I love those!

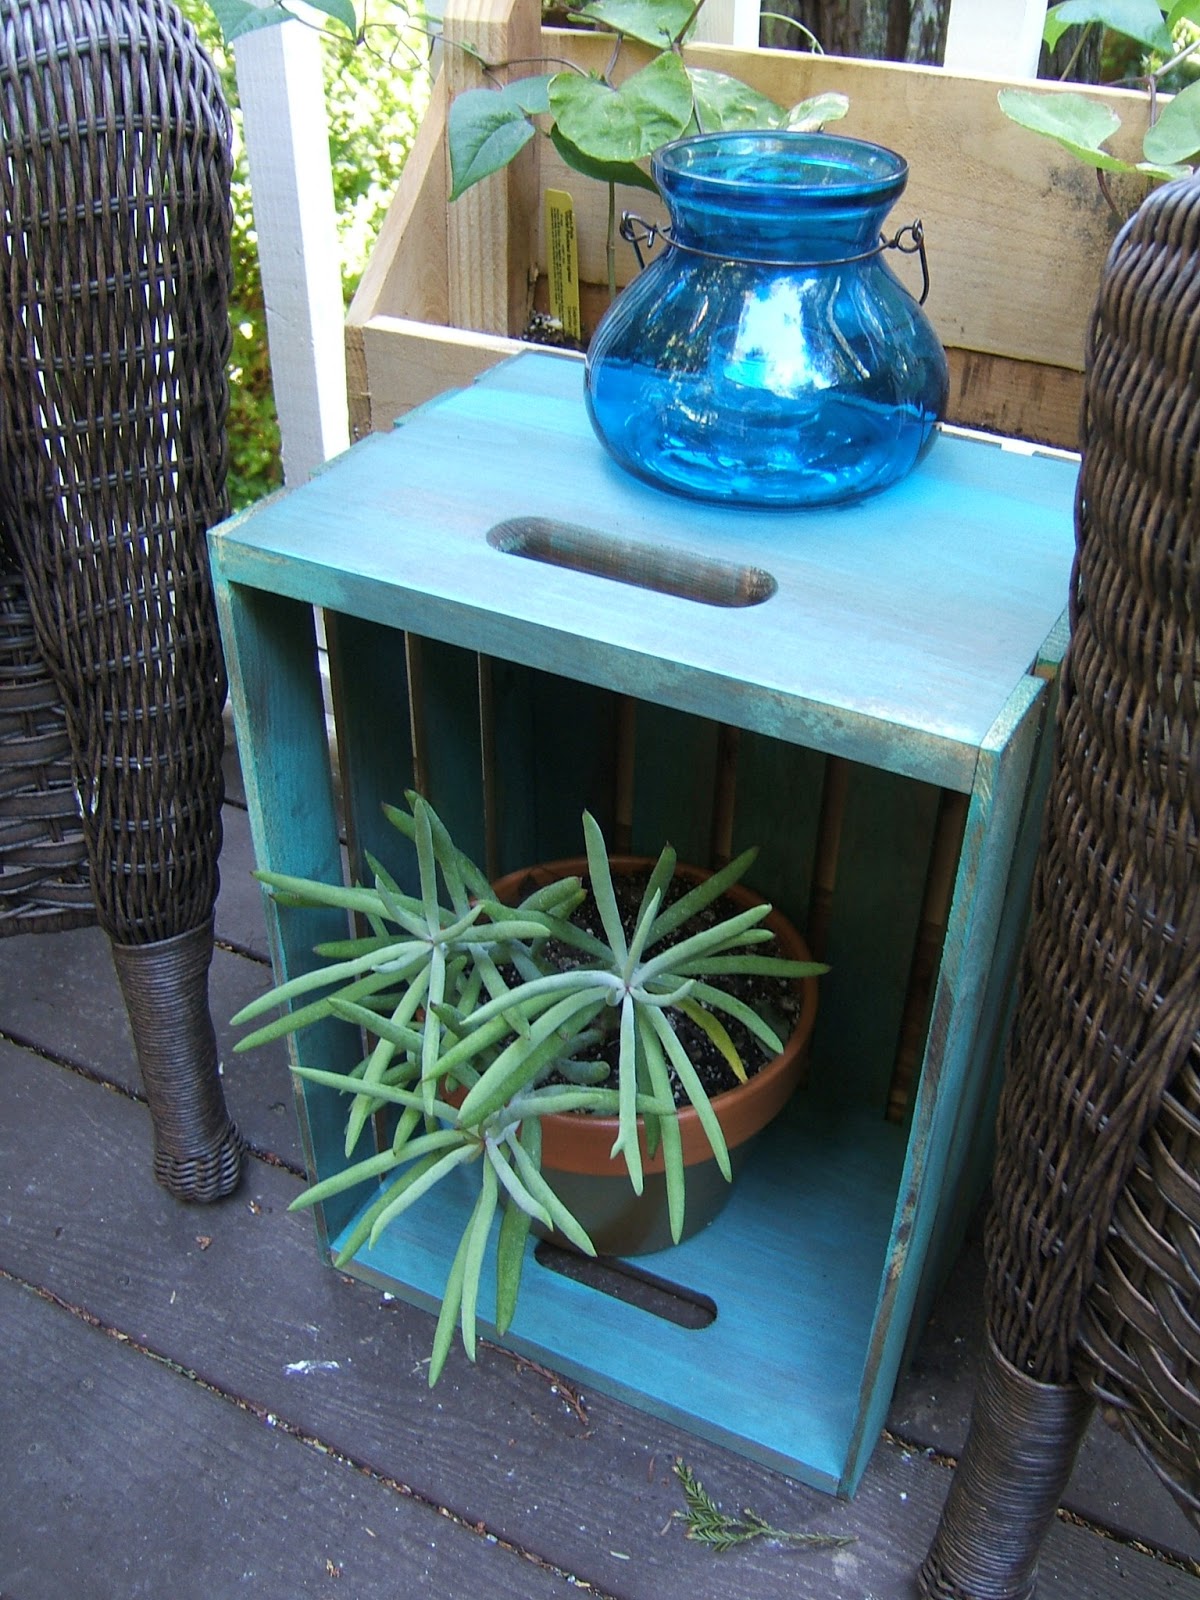
Now grab a drink, set it on your new table, and dream up a wild background story about how these crossed the plains with your ancestors or something.. I dunno.   Just kidding, don't lie.  You're awesome and you did these yourself - spread the word!

What projects do you have lined up for this weekend? It's supposed to be pretty hot here in Ben Lomond, so I see either a beach day, a river day, or a lot of fans & cold beer. Either way, I'm glad it's FRIDAY.....

Take care & Happy Summer,

-Jesse

Related Posts:


Linkies: FacebookPinterestInstagramTwitterSubscribe & of course, Email me.

Post a Comment

Wednesday, June 26, 2013

New String Art Fonts

Last week I shared one of my newer fonts, Market, and I'm SO happy to share yet another new font I got to try out. This one is called Remachine, and I love how retro it is... it's like handwriting, of a really awesome person:
Plus I tried out an ombre fade technique with three colors of strings here.. green, to teal-y turquoise, to blue..
I had some space on the sides and added the retro stars.....
This is customizable and up in the shop if you love it as much as I do.  Here's the others I wrapped up this week (pun totally intended).  Mason & Luke, two colorful tablets for children's rooms:


Both these styles are available in the shop, and all the details of exactly which colors they are have been posted the listing to.  Easy!  I've had some requests to post stain & string choices here on the blog, ask and ye shall receive! Here are the stains I usually use, but I have many times just done a Color Wash technique when these stains aren't exactly what someone is looking for.  Like this blue tablet with purple bird.  Cue the "put a bird on it" clips...
Then the strings! Literally hundreds of choices here, not to mention the limitless combinations you could get into with these... can't wait to try another Ombre fade! Sorry, that fad is not over for me. Not even close!
Might as well show the fonts while we're on the subject:
I can't wait to try all these out! There is one missing here, it was "Lucida Handwriting", it was a "Home" Tablet and the strings were actually negative, meaning they filled in everything EXCEPT for the words... kinda nifty...

If you're looking to order, and don't feel like waiting for me to set a custom listing up for you, just click here and purchase the listing that matches the number of letters in the name you want.  Also, it helps me move things right along if you can provide this info in the "Notes to Seller" section:

-Stain Choice
-String choice (as many as you'd like)
-Nail Choice: Silver or Copper
-Font Choice
-What name, letters or numbers?
-Any special requests?


Well, back to work for me, what has you busy this week?

-Jesse

Up Next: Make New Wooden Crates Look Old in ONE day...


Linkies: FacebookPinterestInstagramTwitterSubscribe & of course, Email me.

Post a Comment

Monday, June 24, 2013

DIY Simple Raised Bed.... on wheels!

Last week I posted a lil tour of the front deck, now that it's finally coming together. If you missed it, check it out here.  So with this tour will come a lot of tutorials, most of which are super easy.  Luckily I've made many of the mistakes FOR you, so you don't have to...isn't that sweet? So first up, what started the front deck redo project, a raised bed:
I may have mentioned before, we have deer. Not just the occasional deer, but the visit 3-4 times a day type of deer. So an herb garden within their reach seemed out of the question, which is why we redid the front deck first. I love to cook, and this deck is right off the kitchen, so perfect, right?  I wanted a good sized raised bed to grow herbs in, and started dreaming up this little beauty. I wanted the rustic look, so I went with fence lumber.  It was also cheap..another quality I love.

Wanna make one? Hooray - Here's what you're gonna need:
  • Wood! I used Redwood fence boards.  I bought 2 - 1x8, 6 foot long pieces.
  • A 4x2 OSB board.  These are around $6, and will be the base.
  • 1 - 4x4 - 8 feet long. 
  • Set of casters (optional but recomended)
  • Wood screws
  • Nails
  • Hammer, Drill
  • Minwax Polycrylic or other wood seal.  Gotta protect the bottom from moisture!
  • Your choice of tool to cut wood with. I used a  Miter Saw.
  • Optional: 2x2 - 4 feet, for bracing.
OK and now your cut list:
  • Redwood Boards - Cut two 4' pieces, and two 22.5" pieces.  Why not just 2'? Here's where you learn from me. In order for the bottom to sit snugly underneath the sides, you have to compensate for the thickness of the longer sides. Hope that  makes sense. 
  • OSB - leave it as is, a perfect rectangle, hooray for shortcuts.
  • Four 2' long 4x4's. That should use the whole 8 feet you bought. 
  • Optional bracing: Cut your 2x2's to 2 feet long.
So here's our empty spot. A weird greenhouse window in our living room of all places has left this area of the deck pretty useless. Until now!
Here we have everything laid out all nice n pretty:
Notice the bottoms of the 4x4's? I was just goofin around with the miter saw.. it was fun, I'm learning. If you do that, just make sure you don't cut the angles so steep you can't attach the wheels anymore.

First step? I laid the 4x4's down, and attached the short sides.  I used nails first then screws after. I like to mix it up...go ahead and line the sides of the board flush with the sides of the 4x4s.
Then I just stood the two sides up on their sides, and attached one of the long pieces.   You can line that board up flush with the sides of the two sides you already made. It sounds confusing to explain, but you're smart, you'll see what I mean. Nail, nail, screw, screw...
This is breezing by isnt it? Flip it over and attach the other side, as you might of guessed. Now, for the bottom, obviously those 4x4's are going to cause a problem right? Well, just chop some corners right out of that OSB.  Measure your 4x4's, they are never exactly 4" wide.  Cut corners of the same size out of your OSB.  Or you could put the OSB on the ground, frame on top upside down, and just trace...up to you. I just kind of went with it. 
Gently throw your frame upside down, slide your OSB on, and go crazy with the wood screws.  You can see my errors here, that it's not lining up perfectly, and my corners have trouble. This is because I didn't measure correctly, and why I'm warning you to measure twice and cut once.. see what I mean? I've worked the kinks out for ya.
If you opted for the 2x2 bracing now's a great time to throw them in.  Just place them along the inside sides of the 4x4's, and attach absolutely everywhere. While you have it upside down, attach your wheels. They should be pretty self explanatory.
Well there you have it! A planter box. Nevermind those blocks of wood on the inside, that was my brace job because I messed up. Ugh, will I ever live that down? Sure, soon as the dirt hides my mistakes...hehe.

**MUY IMPORTANTE** Osb is chipboard, and will eventually absorb the water (so I'm told).  Drill drainage holes and be sure to seal the inside (and outside if you want) of the planter with any kind of seal. I chose minwax polycrylic because I had it on hand. I didn't seal the outside because I want it to age gracefully, adding to our mountain charm, hah...

Well I think we're done, here's a shot of the optional bracing location, if my description was lame and didn't make sense:
Ha! The graphics kind of look like a bunny or chipmunk face... haha.. ANYway...

Grab some dirt and some plants and get to it:
 Parsley:
Goofing around with the camera & the sun...
Strawberries:
Dwarf tomato, for patios:
One of 10 basil plants ( I love basil!):
Great, you made it to the end! What did you think? It's fairly easy. I'm sure there are millions of planter plans out there, and this is just another one for the pile.  I know it might not last 100 years, but for the cost, ease of assembly and the fact that it's pretty light duty, this is perfect for our herb deck. Seriously this took me about 2 hours, with a lot of breaks. (I get so distracted)

If you decide to make one, share it with me! I love seeing your projects. Hope you have a fast week ahead & can get back to the weekend!

Muah!

-Jesse

Linkies: FacebookPinterestInstagramTwitterSubscribe & of course, Email me.

Post a Comment

Saturday, June 22, 2013

No More Google Reader

Hey everyone! Just a quick post here...kinda urgent... I heard that Google Reader was leaving us soon, so if you get my updates through Googy then you need to sign up another way. You can either subscribe via email or you can sign up for bloglovin, which... is pretty sweet.  Click here to Follow my blog with Bloglovin

Alright, sorry to interrupt your weekend - have a good one!

-J

Post a Comment

Friday, June 21, 2013

I Can See My House From Here!

Well, it's Summer, and I hope you all have amazing and fun plans for the weekend.  We are going to have a BBQ on Saturday night, but our REALLY exciting plans are to do....yardwork.  Yay! I say that with all the sarcasm I can muster up in the morning, I'm not that excited.  But, I'm pretty cheap, so we're doing it ourselves.  We aren't doing the fun kind though, we're doing the tedious kind.. removing gigantic bushes so our house doesn't look like the one that the kids say a witch lives in. I'm no witch.  Remember when I shared that we painted our front retaining wall white?
It was a huge change for the better that totally drew our attention to how the front looks from the street.  See how you can't really see our  house at all? Yea, we're gonna need to change that...  The problem is that these bushes are like 20 feet tall, but are luckily hollow. It just takes a long time to do it. I won't bore you with the details of how yard work goes, I'm sure we've all been there.. all I can say though is that it IS worth the sweat...

So here's the before...
Going.... Going...
.......gone!
And that's only ONE of the bushes.... that took all day! Ok, we started at like 2:30, but whatever.  It's not just the trimming that's a pain, it's dealing with the branches you trimmed off.  Oh well, I love that you can see the house, and now we can give these bushes a fresh start and keep them medium sized vs. gigantic.  Plus now we get to fill up the front with fun flowering shrubs.. now THAT'S fun.. (no sarcasm there..)

I made a fun gif of it, my first ever.

Well that's just lovely. Eek, kind of hard to look at... sorry bout that!  So anyway, that's the plan for Sunday - reel in the other two bushes.

***Update 8/26/13: Took care of those bushes.  See the details here.***

What are you doing for the first official weekend of Summer?

Have a great one!

-Jesse


Linkies: FacebookPinterestInstagramTwitterSubscribe & of course, Email me.

Post a Comment

Thursday, June 20, 2013

String Art: New Font & Another Giveaway

I'm so happy that I've gotten a chance to really dig into some new designs with the string art! Recently there was the Giraffe, and then before that was that crazy owl... and finally I got the opportunity to do a name tablet in one of my favorite fonts; Market:
Lucky for me the winner of the last giveaway let me run free with the fonts, and I've been itching to do this retro font for a WHILE.  I love how it came out, and her color choices were so complimenting of the font too... very nice.
Finally, now I have an example of this font for when I try to talk people into it! hehe...
Also, for the first time ever, I finished up a state string art.  I had never attempted one of these before, but I'm sure you've all seen them all over Pinterest.  Well, here was my hand at one, this person requested Iowa, and the heart to be in West Des Moines:
I was a little intimidated but it came out pretty nice! She ordered two colors, and I decided to use the gold as a border.

Ok, now I mentioned a giveaway didn't I? Well... my friend Karen from Redoux Interiors is hosting a giveaway for me today! One lucky winner will get their pick of anything in the shop, or any design they can think up for me to try out.  As you can see, I love trying out the new designs!

Hop over to Karen's blog, Redoux Interiors, to enter the giveaway & good luck.  While you're there, browse her site - she's a genius when it comes to finding new life for old furniture, I swear.

Alright my loves, it's back to the strings for me - I have 7 more orders that need to go out this week.  If you are interested in any custom work, please feel free to message me or browse the shop to place an order.  For more string art posts on the blog, click here.

Have a great one!

-Jesse


Linkies: FacebookPinterestInstagramTwitterSubscribe & of course, Email me.

Post a Comment

Related Posts Plugin for WordPress, Blogger...

Shareaholic